

Many times while cooking, your hands get burnt and in the pursuit of immediate treatment, you adopt the wrong methods of home remedies, which has a bad effect on the skin.

While working in the kitchen, minor incidents of burns often happen to you. Sometimes while baking roti, your hand gets burnt and sometimes while making puri or paratha, hot oil or ghee splashes on the skin, which causes burning sensation in the skin.
In such a situation, to get relief, you adopt some home remedies like applying ice and toothpaste. But it is also necessary to consult a doctor. According to doctors, there are three levels of burns and treatment is required accordingly.
First Degree Burn:
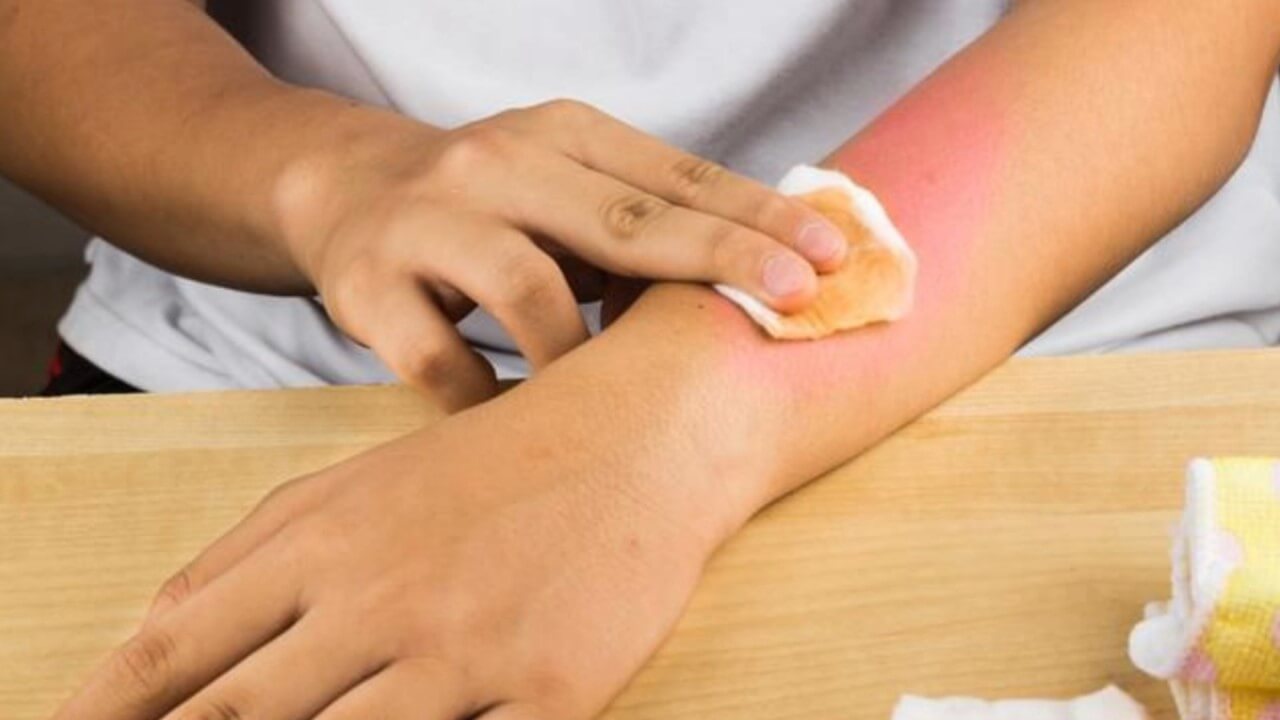
In first degree burn, there is less damage to the skin, because in this only the uppermost surface of the skin gets burnt. In this, there is redness, minor swelling and pain on the skin. First degree burn usually heals in 7 to 10 days and the burning marks also gradually start disappearing.
A first-degree burn, also known as a superficial burn, affects only the outermost layer of skin (the epidermis). Here are the key points:
Symptoms:
- Skin redness
- Mild pain
- Swelling
- Peeling skin after a day or so
- Unlike second-degree burns, first-degree burns do not blister.
Causes:
- Sunburn: Prolonged sun exposure without sunscreen.
- Scalds: Hot liquids or steam.
- Electricity: Exposure to electrical sources.
Treatment:
- Most first-degree burns can be treated at home.
- For larger burns or those in sensitive areas (like eyes, nose, or mouth), consult a doctor.
- Important: Electrical burns may affect more skin layers than visible, so seek medical attention promptly.
Remember to apply sunscreen, avoid extremely hot water, and keep electrical hazards away to prevent first-degree burns! 🌞🔥
Second Degree Burn:
This is a serious condition of burning, because in this the second layer of the skin also gets burnt. In this burn, blisters appear on the skin.
It takes more than three weeks to heal. Due to this the color of the skin also changes and it leaves a light mark but this does not happen in all cases.
In some cases the marks also disappear. In second degree burn, you should go directly to the doctor. If you are careless, then the risk of infection increases at the burnt place on the skin.
Third Degree Burn:
This is the most serious condition of burning. In this every layer of the skin gets burnt and the internal organs also get more damaged. In this burn, the skin gets so much damaged that the nerves also get damaged, due to which the burning sensation cannot be detected. So go directly to the doctor without being careless.
A third-degree burn, also known as a full-thickness burn, is the most severe type of burn. Here are the key points:
Extent of Damage:
- All layers of the skin (epidermis, dermis, and subcutaneous tissue) are affected.
- The burn extends into deeper tissues, including muscles, tendons, and bones.
- Internal organs can also be damaged due to the severity of the burn.
Symptoms:
- Numbness: The nerves are destroyed, so there’s no sensation of pain or burning.
- White or charred appearance: The skin may appear white, brown, or black.
- Leathery texture: The burned area feels tough and rigid.
Treatment:
- Emergency medical attention: Third-degree burns require immediate professional care.
- Avoid home remedies: Do not apply ice or ointments; seek medical help promptly.
- Prevent shock: Elevate the burned area and keep the person warm.
Remember, third-degree burns are serious and can be life-threatening. Seek medical help without delay! 🚑🔥
What to Do:
Usually first degree burn occurs while cooking, so first of all wash that area with cold water until the skin cools down completely. Do not rub that area while washing. This can damage the skin.
When dealing with a first-degree burn, follow these steps:
Cool the Burned Area:
- Run cold water over the burn for several minutes.
- This helps reduce pain and prevents further damage.
- Avoid ice or very cold water, as it can worsen the injury.
Gently Pat Dry:
- After cooling, pat the area dry with a clean cloth or sterile gauze.
- Avoid rubbing, as it can harm the skin.
Apply a Mild Ointment or Cream:
- Use an antibiotic ointment or burn cream to keep the area moisturized.
- This promotes healing and reduces the risk of infection.
Cover with a Clean Bandage:
- Use a sterile bandage or non-stick gauze to cover the burn.
- Change the bandage daily to keep the area clean.
Pain Relief:
- Over-the-counter pain relievers like acetaminophen or ibuprofen can help manage discomfort.
Remember, if the burn is large, affects sensitive areas (like the face or genitals), or shows signs of infection, seek medical attention promptly. 🌡️🔥
What not to Do:
If blisters have formed on the burnt area, do not burst them. This can cause infection. You can use antiseptic cream or lotion as per doctor’s advice. Do not use antiseptic liquid on burnt skin. This can cause irritation in the skin. One should avoid touching the skin repeatedly, as this can increase the infection.
Here’s what not to do when dealing with a burn:
Don’t Burst Blisters:
- If blisters form on the burnt area, avoid popping them.
- Bursting blisters can lead to infection and slow down healing.
Avoid Antiseptic Liquid:
- Do not use antiseptic liquid directly on burnt skin.
- It can cause irritation and delay healing.
Consult a Doctor for Antiseptic Cream or Lotion:
- Use antiseptic cream or lotion as advised by a medical professional.
- Follow their recommendations for proper care.
Minimize Touching the Burned Skin:
- Repeatedly touching the skin can increase the risk of infection.
- Keep the area clean and avoid unnecessary contact.
Remember, proper care and avoiding harmful practices are essential for effective burn management! 🔥🚑
In Home Remedies: Coconut Oil
Wash the burnt part of the skin with tap water. After this, apply antiseptic cream and 'paraffin sheet gauze' and tie a bandage. Paraffin sheet gauze is a mesh-like bandage, which contains wax. It does not allow the affected skin to stick to the bandage, which helps the wound to heal quickly. To avoid pain and infection, you can also take medicines as per doctor's advice. In case of burns, you can use only coconut oil in home remedies.
Coconut oil has several beneficial properties, and it can be used in various home remedies. Let’s break down the details:
Burns and Coconut Oil:
Initial Care:
If you have a burn, start by rinsing the affected area with cool tap water. This helps remove any debris and cools down the skin.
Antiseptic Cream:
Apply an antiseptic cream to the burnt skin. Antiseptic creams help prevent infection and promote healing.
Paraffin Sheet Gauze:
The use of paraffin sheet gauze is interesting! This mesh-like bandage contains wax, which prevents the affected skin from sticking to the bandage. As a result, it allows the wound to heal more quickly.
Bandage:
After applying the antiseptic cream, cover the burn with the paraffin sheet gauze and secure it with a bandage. This protects the wound and keeps it clean.
Pain Management and Medicines:
To manage pain and prevent infection, follow your doctor’s advice regarding pain relief medications.
Coconut Oil:
Interestingly, coconut oil can also be used in home remedies for burns. Its natural properties may help soothe the skin and promote healing. However, it’s essential to consult with a healthcare professional before using coconut oil on burns.
Remember that while coconut oil has potential benefits, it’s crucial to seek professional medical advice for severe burns or any significant injuries. Always prioritize safety and consult a healthcare provider when in doubt.
If you have any other questions or need further information, feel free to ask! 😊


you aree actually a excellent webmaster. The websit loading
speed is incredible. It seems tthat you’re doing anny
unijque trick. Moreover, Thhe contents are masterpiece.
you’ve performed a fantastic tas in this topic!
I was suggested this blog by my cousin. I am not sure whether this post is written by him as nobody else know such detailed about my difficulty. You’re incredible! Thanks!
Can I just say what a relief to search out someone who really knows what theyre speaking about on the internet. You positively know how you can convey a problem to light and make it important. Extra individuals need to read this and understand this facet of the story. I cant consider youre no more popular since you definitely have the gift.
What’s up, I want to subscribe for this blo to take hottest updates, so wherde caan i doo
iit pleasse help.
Nice weblog right here! Additionally your webb site rather a lot up vefy fast!
What web host are you thhe uuse of? Can I gget yopur assoociate lnk to ykur host?
I wixh my sjte loaded upp as quikckly ass yopurs lol
Having red this I believed itt waas rather enlightening.
I appreciate youu finding tthe tijme andd energy to pput this ccontent together.
I once again findd myself personally spending waay tooo much time bothh readin and
posting comments. Buut so what, itt was stipl worthwhile!
This blog is definitely rather handy since I’m at the moment creating an internet floral website – although I am only starting out therefore it’s really fairly small, nothing like this site. Can link to a few of the posts here as they are quite. Thanks much. Zoey Olsen
I’m really enjoying the theme/design of your site. Do you ever run into any web browser compatibility issues? A handful of my blog readers have complained about my website not operating correctly in Explorer but looks great in Firefox. Do you have any tips to help fix this issue?
I actually wanted to make a quick comment to be able to express gratitude to you for those amazing guidelines you are showing here. My long internet search has finally been rewarded with wonderful tips to write about with my relatives. I would suppose that most of us website visitors are definitely lucky to exist in a magnificent website with very many awesome individuals with beneficial guidelines. I feel very much privileged to have discovered your web pages and look forward to tons of more fun times reading here. Thank you once again for everything.
Hi there, I found your web site by means of Google at the same time as searching for a similar topic, your web site came up, it appears to be like great. I’ve bookmarked it in my google bookmarks.
ロシア人のポルノ .tUYVo1I3wrr